Conceal-pay
Conceal.Pay makes it simple for businesses and people to receive payments on the Conceal.Network. Conceal.Pay is seamlessly integrated with the Conceal.Cloud for absolute ease of use. You can easily create URLs with a simple web page where customers and friends can send you payments. Conceal.Pay makes it trivial for you or your business to receive payments online, fast.
Conceal Pay is a product of Conceal.cloud and offers two extra ways of receiving payments in CCX.
Simple payment request / donation
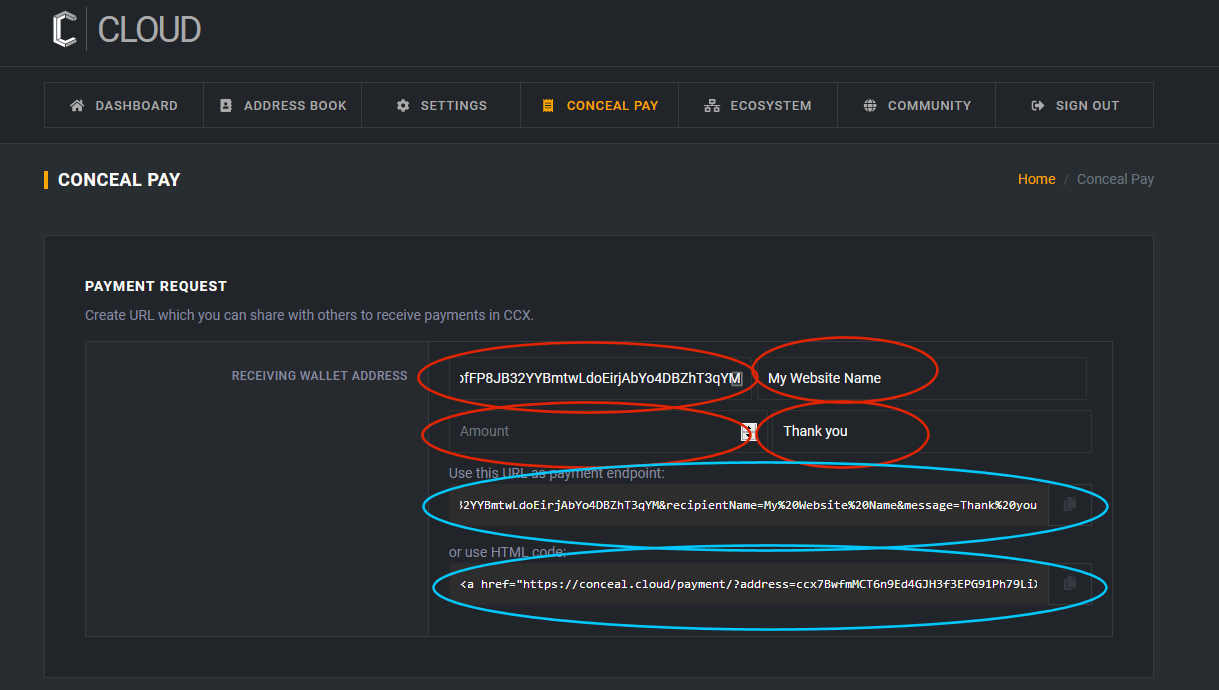
The first method is a simple HTML widget that allows users to place a button on their website or just share a link and get paid. The amount of CCX can be predefined as well as a description of the payment/donation. To achieve, just go to Conceal.cloud, create a wallet, click on the top menu for “Conceal Pay” and in the upper section of the page set the receiving address as well as your name. The predefined amount and message are optional. Once this is done you will get both URL and an HTML widget.
Note that for this to work, both parties need to own a Conceal.cloud account.
Step by step guide
First click on Conceal Pay link in conceal.cloud, in the top block fill the address where the funds will arrive, then fill the name you would like for people to see. Amount can be predefined as well as the message that will appear inside the transaction metadata. This will generate a URL or HTML code that can be embedded into your website/blog/social media page.
Usually HTML code is embedded either with a text editor on a specific page that you wish or in an editor like wordpress. For example: https://www.inmotionhosting.com/support/edu/business/wordpress-introduction/adding-html-wordpress Once someone clicks that button or the link they will be asked to login to their conceal.cloud account and see this form:
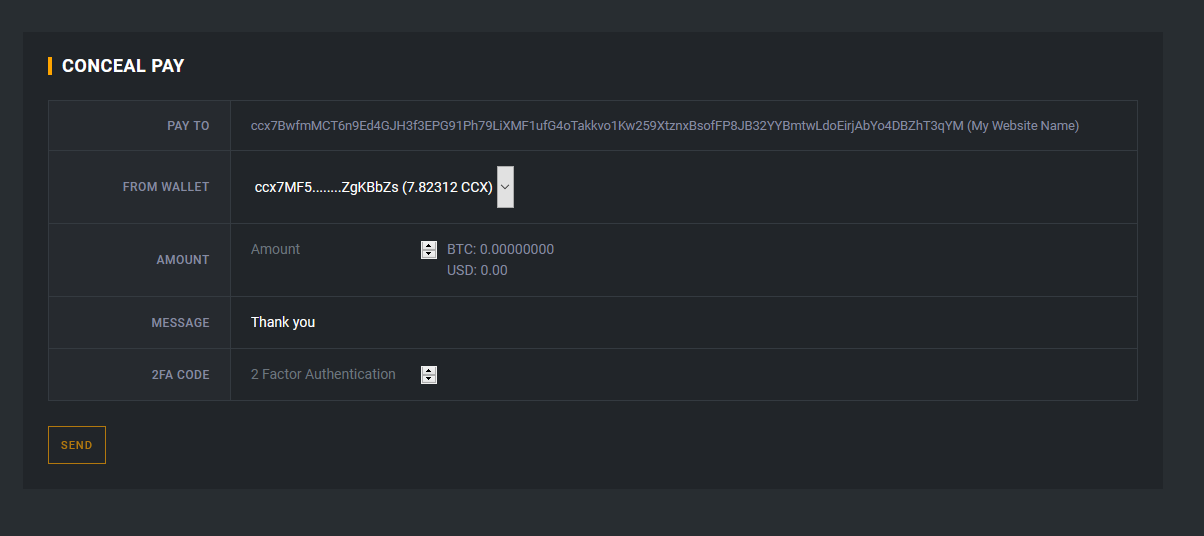
The only thing to do here is fill the amount (if it isn’t predefined by you upfront). Once user clicks SEND, the funds will be on your account.
Advanced payment with Instant Payment Notification
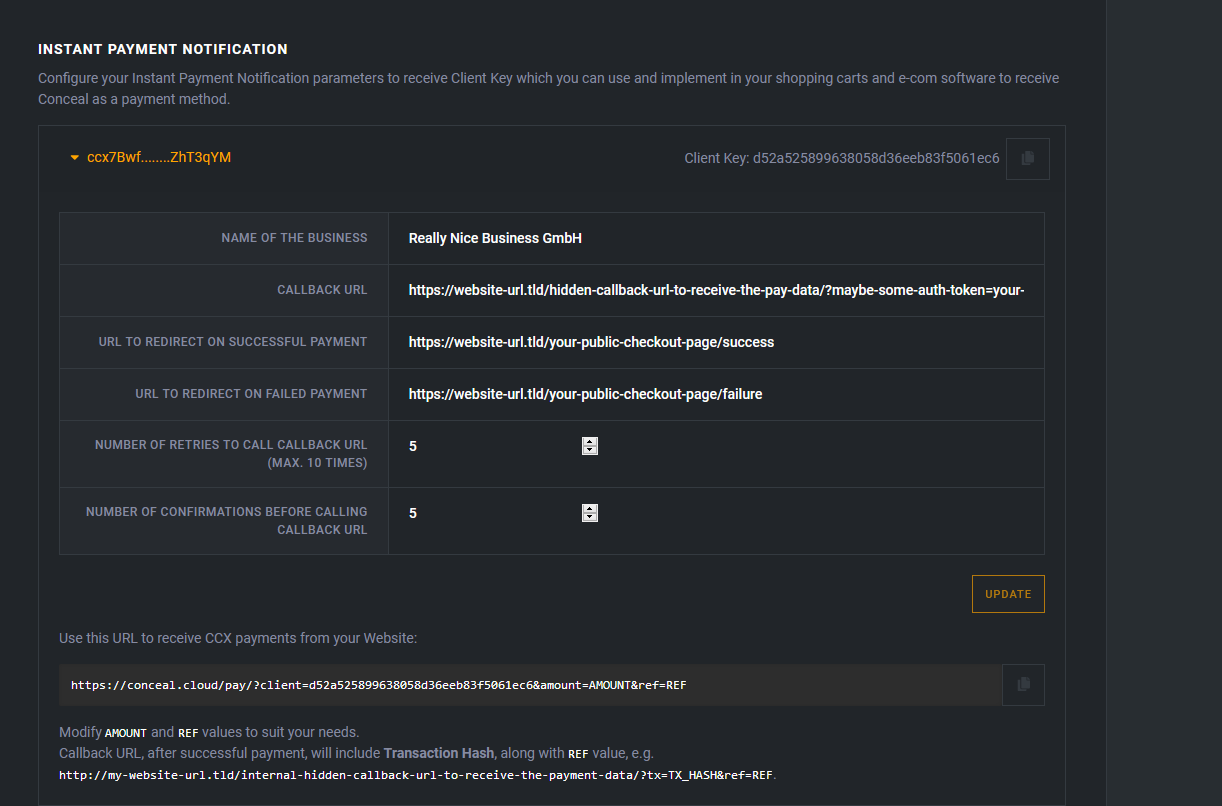
Second method is more advanced and can be integrated into more complex websites. The principle of functioning is similar to PayPal’s API with IPN. To achieve this just go to Conceal.cloud, create a wallet, click on the top menu on “Conceal Pay” and in the lower section of the page find the wallet that you want to use to receive payments and fill the necessary fields.
Name of the business: The name of your website or online service
Callback URL: This is your internal website’s URL that will receive the confirmation from our side once the payment goes through to your wallet. This endpoint will be called by our system by a [POST] method with the following raw json data
{
   "amount":1,
   "fee":0.0001,
   "ref":"yourInternalPaymentReferenceGoesHere",
   "tx":"transactionHasGoesHere"
}
URL to redirect on successful payment: This is the URL of your service to which conceal.cloud will redirect the user after successful payment.
URL to redirect on failed payment: This is the URL of your service to which conceal.cloud will redirect the user after failed payment.
Number of retries to call callback URL (max. 10 times): Amount of times conceal.cloud will try to reach your service to give a successful callback in case of an initial failure (networking, system down, etc.)
Number of confirmations before calling callback URL: Threshold of confirmations for the transaction before informing your service that the payment is successful.
Once all the fields are set, you will receive the URL that you need to use in your website/service to redirect in case your user wants to pay with CCX. This URL needs to be updated with the amount and your internal payment reference for later matching from our side in case of success.
Step by step guide
For people wanting to integrate payments with conceal.pay system into their e-commerce or service’s website, we have a very functional feature to offer. This requires some technical knowledge, ideally made by the person who is a web developer.
First thing that you have to do is to implement a callback endpoint on your e-commerce platform to receive payment confirmation data from our conceal.cloud side. This should be non-public URL, ideally behind some API1 key or similar.
For example if you website is www.my-supercool-store.tld, you can create a script responsible for getting the data under www.my-supercool-store.tld/payment-callback/?apiKey=abcde12345. This will be your callback URL that you need to give us.
Second thing you have to be able to provide are both success/fail URLs for us to redirect the customer to. Like www.my-supercool-store.tld/checkout/success and www.my-supercool-store.tld/checkout/failure.
Once you have this information, open conceal.cloud, make sure you have one wallet created (and keys backed up), click conceal pay section and in the bottom fill the form related to your wallet address.
Name of the business is what will show up on the title (similar to how paypal works)
Callback URL is what was described above, as well as success/failure URLs.
Nr. of retries is the amount of times our system will try to reach your callback URL in case of system errors until giving up.
Nr. of confirmations is the amount of confirmations that transaction needs to have before we trigger a call to your callback endpoint.
Once you click update, you will get a unique URL in the bottom that you need to integrate into your website. This is the url that you will redirect your user to after he selects CCX as a payment method. Once he has paid or cancelled, we redirect back respectively to your success or failure urls.
For example:
https://conceal.cloud/pay/?client=d52a525899638058d36eeb83f5061ec6&amount=AMOUNT&ref=REF
This is an example URL generated by your system. Your e-commerce platform has to use this url but also has to adapt the AMOUNT and REF (reference) fields.
Let’s say the user created an order in your system and selects CCX to pay. Your system already has the order inside your database with some ID like for example order-12345 and amount to be paid like 100CCX. Before you redirect to conceal.pay link, it needs to be modified like this:
https://conceal.cloud/pay/?client=d52a525899638058d36eeb83f5061ec6&amount=100&ref=order-12345
What user will see is this:

That's it. Once the payment is done, user is redirected to a success URL you provided. After N amount of confirmations, we will make a call to your callback URL with the following data
[
    'amount' => 100,
    'fee' => 0.0001,
    'ref' => 'order-12345',
    'tx' => '36799a622bef667355b252fcc12e74667faee74e4259d3f19ea48f685a0fae66'
]
This will be a POST method call with JSON body as data. Your e-commerce platform will have to know how to handle this.